Being able to connect to your Raspberry Pi through WiFi and either extend your home network or have a direct connection with your Pi is a pretty simple, but powerful use case for any Pi model. You can use it as WiFi Hotspot, which means the Raspberry Pi acts as a bridge between your (mobile) device and the Internet connection at home.
What you need:
- A Raspberry Pi with [tooltip tip=”Operating System”]OS[/tooltip] (any model)
- A USB WiFi connector which support AP mode
- An Internet connection (via Ethernet)
Note: You should select a central position for the Pi to have a good WiFi coverage of the area.
Installation and Setup
You need to operate either directly on the Pi or have an SSH connection. Once you can access the console, you should update the packages and the OS with
sudo apt-get updatesudo apt-get dist-upgradesudo rpi-updatesudo reboot
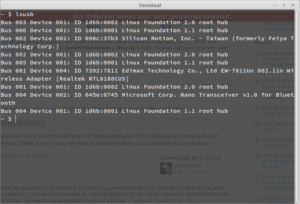
Now that you have an updated system, we check if the WiFi connector gets detected by the system by entering lsusb.
For me, it is this entry:
Edimax Technology Co., Ltd EW-7811Un 802.11n Wireless Adapter [Realtek RTL8188CUS]
Next, let’s install the required software.
sudo apt-get install hostapd dnsmasqSetup Access Point
The next step is to assign a static IP to our WiFi connector. You need to edit the file
/etc/network/interfaces
(needs root). The content should look like this:
auto lo
iface lo inet loopback

# ...
iface wlan0 inet static
address 192.168.2.1
netmask 255.255.255.0
Make sure you use wlan0 only once in the file.
Next, we set up hostapd. Edit the file /etc/default/hostapd
# Defaults for hostapd initscript
#
# See /usr/share/doc/hostapd/README.Debian for information about alternative
# methods of managing hostapd.
#
# Uncomment and set DAEMON_CONF to the absolute path of a hostapd configuration
# file and hostapd will be started during system boot. An example configuration
# file can be found at /usr/share/doc/hostapd/examples/hostapd.conf.gz
#
DAEMON_CONF="/etc/hostapd/hostapd.conf"

# Additional daemon options to be appended to hostapd command:-
#    -d show more debug messages (-dd for even more)
#    -K include key data in debug messages
#    -t include timestamps in some debug messages
#
# Note that -B (daemon mode) and -P (pidfile) options are automatically
# configured by the init.d script and must not be added to DAEMON_OPTS.
#
# DAEMON_OPTS=""
Edit the first line which does not start with # (which is a comment). Set DAEMON_CONF to “/etc/hostapd/hostapd.conf”. This will be our configuration file for hostapd, which we will create next.
You can create your own configuration or just copy mine below:
# The used interface
interface=wlan0
# Important! This is the driver used. This one is for Realtek only.
driver=rtl871xdrv

# Daemon settings
ctrl_interface=/var/run/hostapd
ctrl_interface_group=0

# WiFi configuration
ssid=My Pi
channel=3
hw_mode=g
ieee80211n=1

# Security setting
# Change the password here!!!
wpa=2
wpa_passphrase=mySecretPassword123
wpa_key_mgmt=WPA-PSK
wpa_pairwise=CCMP
rsn_pairwise=CCMP

# set this to US or whatever country you are in
country_code=US
Important: Hold in mind that you are not allowed to put spaces before or after the equal signs.
DHCP settings
Next we need to assign an IP to all devices which connect to the access point. So edit the dnsmasq configuration file located in
/etc/dnsmasq.conf
dnsmasq.conf
# Configuration file for dnsmasq.
# ...
# If you want dnsmasq to listen for DHCP and DNS requests only on
# specified interfaces (and the loopback) give the name of the
# interface (eg eth0) here.
# Repeat the line for more than one interface.
interface=wlan0
# ...
# Uncomment this to enable the integrated DHCP server, you need
# to supply the range of addresses available for lease and optionally
# a lease time. If you have more than one network, you will need to
# repeat this for each network on which you want to supply DHCP
# service.
# Connected devices get an ip from the given range which is valid for 12 hours.
dhcp-range=192.168.2.2,192.168.2.100,255.255.255.0,12h
# ...
Now you only need to restart both services and you should be able to connect to the Pi.
sudo service hostapd restart
sudo service dnsmasq restart
There you are. Now you can access the Raspberry Pi by connecting to the WiFi and using the Pi’s static address 192.168.2.1 to ssh into it. For Internet access, you need to use iptables and configure them to forward any packages from wlan0 to eth0.

Hi I am using Pi 3 but unable to hide the SSID even I have set following parameter in /etc/hostapd/hostapd.conf
ignore_broadcast_ssid=1
I have read about this problem. This seems to be a driver issue with hostapd, see more here: http://lists.shmoo.com/pipermail/hostap/2010-May/021474.html